
Autopilot setup
Autopilot – short notes to start from
demo:
some general usefull things around autopilot
Get HWID
md c:\HWID
Set-Location c:\HWID
Set-ExecutionPolicy -Scope Process -ExecutionPolicy Unrestricted -Force
Install-Script -Name Get-WindowsAutopilotInfo -Force
$env:Path += “;C:\Program Files\WindowsPowerShell\Scripts”
Get-WindowsAutopilotInfo.ps1 -OutputFile AutopilotHWID.csv
OR instead of doing HWID manually you can enrole the HWID in one step
|
1 2 3 4 5 6 7 8 9 10 11 12 13 14 |
Start OOBE on Device: [Shift]+F10 PowerShell.exe -ExecutionPolicy Bypass Install-Script -name Get-WindowsAutopilotInfo -Force Set-ExecutionPolicy -Scope Process -ExecutionPolicy RemoteSigned Get-WindowsAutopilotInfo -Online -TenantName "tenant-name" -GroupTag "AutoPilot" -verbose Or you can use this cool GUI: In OOBE: Start the Command Line by simultaneously pressing Shift + F10. Open Powershell by typing in Powershell. Set-Executionpolicy RemoteSigned Install-Script Get-WindowsAutopilotImportGUI Get-WindowsAutopilotImportGUI |
Autopilot Import GUI – Cloud Blog (ugurkoc.de)
Sysprep OOBE
PS C:\HWID> cd C:\Windows\System32\Sysprep
PS C:\Windows\System32\Sysprep> .\sysprep.exe /OOBE /Reboot
Create Autopilot Group:
(device.devicePhysicalIDs -any (_ -contains “[ZTDId]”))
Script – Bulk create common AAD Groups for MSIntune – Let’s ConfigMgr! (letsconfigmgr.com)
with (device.devicePhysicalIds -any (_ -eq “[OrderID]:Standard”)) you can filter by GroupTag
Company Branding:
Azure Active Directory > Company branding MECM
- Tenant administration.
- Under End user experiences, click on Customization.
Enable Autopilot
- Azure Active Directory > Mobility (MDM and MAM) > Microsoft Intune.
- In the MDM user scope setting, select All.
Configure Autopilot
- Under Device enrollment, click on Enroll devices.
- Under Windows Autopilot Deployment Program, click on Devices.
- Click Import, and select the MyComputers.csv file saved from before and click Import.
- On the Devices > Enroll devices pane, click Deployment Profiles > + Create profile and select Windows PC.
- On the Basics step, in the Name box, type Autopilot Test Profile and click Next. Note: Leave the Convert all targeted device to Autopilot set to No.
- On the Out-of-box experience (OOBE) step, in the Deployment mode dropdown, select user-driven.
- In the Join to Azure AD as dropdown, select Azure AD joined.
- For the Microsoft Software License Terms option, select Hide.
- For the Privacy Settings option, select Hide.
- For the Hide change account options option, select Hide.
- For the User account type option, select Standard and click Next.
- In the Assignments step, under Included groups, click + Add groups, select the Autopilot Devices group just created and click Select and then click Next.
- In the Review + create step, click Create.
- Wait a few minutes for the device to show up in Assigned devices under Autopilot Test Profile.
- Click on Devices > Enroll devices > Windows Autopilot devices and you should be able to see the PROFILE STATUS as Updating and then further Assigned. Wait for a few moments.
Start OOBE on Client
Configure PreProvisioned Autopilot:
Prerequisites:
- Windows 10, version 1903 or later, or Windows 11.
- Windows Pro, Enterprise, or Education editions.
- An Intune subscription.
- Physical devices that support TPM 2.0 and device attestation; virtual machines are not supported. The pre- provisioning process leverages Windows Autopilot self-deploying capabilities, so TPM 2.0 is required. The TPM attestation process also requires access to a set of HTTPS URLs that are unique for each TPM provider. For more information, see the entry for Autopilot self-Deploying mode and Autopilot pre-provisioning in Networking requirements. Physical devices with Ethernet connectivity are required to perform pre-provisioning. Wi-Fi connectivity isn’t supported because of the requirement to choose a language, locale, and keyboard to make that Wi-Fi connection. Enforcing this requirement in a pre-provisioning process could prevent the user from choosing their own language, locale, and keyboard when they receive the device. For more information, see Using a wireless network connection with Windows Autopilot white glove
MECM:
On the Basics step, in the Name box, type Autopilot preprovisioned deployment test profile and click Next.
Client:
- On the cleint in the OOBE-Phase Let’s set things up for your work or school screen, press the Windows key five times to view an additional options dialog. From that screen, choose the Pre-provision with Windows Autopilot option and then click Next.
- A QR code containing a unique identifier for the device, useful to look up the device in Intune to make any configuration changes (example: assigning a user, adding the device to any additional groups needed for app or policy targeting).
- Validate the information displayed. If any changes are needed, make those and then Refresh to re-download the updated Autopilot profile details.
- Click Reseal to shut the device down. At that point, the device can be shipped to the end user. Note: If the pre-provisioning process fails, a message that says Something went wrong will be displayed with information about the device, and a QR code that can be used to review the results. Diagnostic logs can be gathered from the device, and then it can be reset to start the process over again.
After that > User Flow
Convert existing device to Autopilot
Intune Devices:
Device enrollment > Windows enrollment > Deployment Profiles > Create Profile>Set Convert all targeted devices
SCCM (Co-Management devices)
First, get the devices into Intune via co-management and then to Autopilot > Set Convert all targeted devices
Windows 7 Devices:
Upgrade Windows 7 using Windows Autopilot in Configuration Manager – Microsoft Tech Community
faster: Speeding up Windows Autopilot for existing devices | Microsoft Docs
Device with Windows 10 but without SCCM and no Intune
I have written this script to get the such devices to Intune Autopilot. All that is required is A User with the permission to enroll.
Intune AD connector (Intune Connector for Active Directory)
Windows Autopilot Workflow – Hybrid Azure AD Join
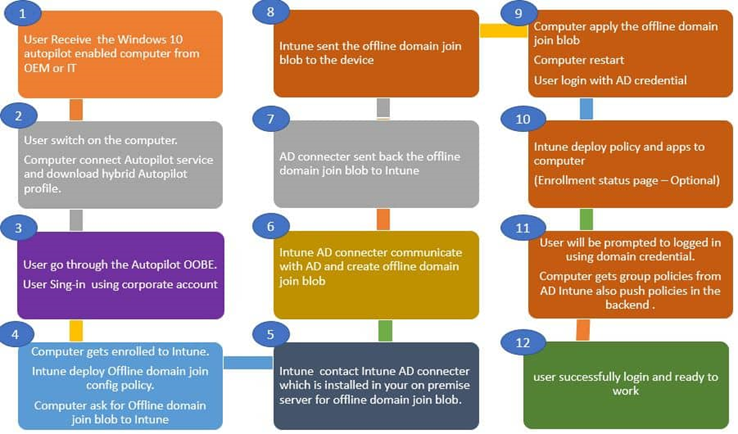
Following are the Intune AD connector requirement. Make sure that you have all the needs in place before the implementation. * The Intune Connector installation requires Windows Server 2016 or later.
- Intune Connector Server should be able to communicate with Active Directory.
- Intune Connector Server must have access to the internet. If you have a proxy in your environment, please follow the proxy recommendations.
- In production, For High availability, Consider multiple servers with connectors.
- If you have any Active Directory domains in your environment, consider a connector for each part.
- Intune AD connector server system locale should be set to English US.
Install Connector
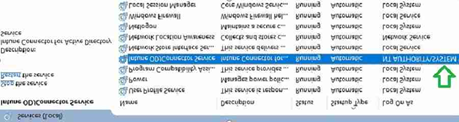
Select Device enrollment > Windows enrollment > Intune Connector for Active Directory > Add connector > Click on the download Connector setup file > Install the executable ODJConnectorBootstrapper.exe.
For Intune connector Installation logs, you can navigate to below path. C:\Users\userid\AppData\Local\Temp\Intune_connector_for_Active_Directory_ • The server computer object ($) must have permission to create the computer objects in AD.
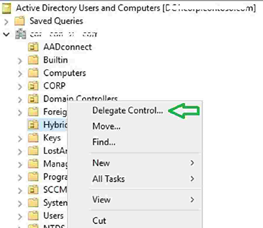
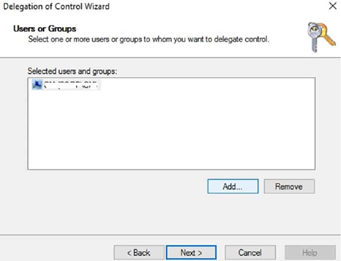
• NOTE! – By default, all domain accounts have permission to join a maximum of 10 computers to AD. To change this default behavior, you need to delegate permission. Let’s configure the permission. • Launch Active Directory Users and Computers (DSA.msc). • Right-click the organizational unit and then select Delegate Control.
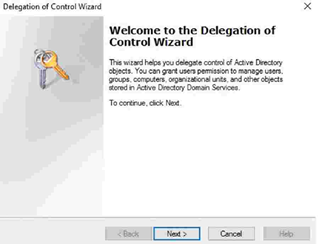
• Delegate Control for Intune Connector for Active Directory – Windows Autopilot Hybrid Domain Join Scenario 13 • Select “Next” to continue.
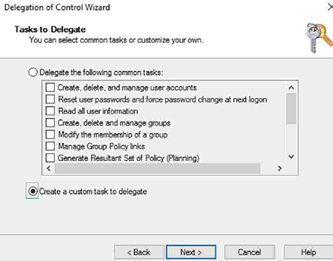
• In the Delegation of Control wizard, add your Intune connector server computer object. • Select Create a custom task to delegate > Next.
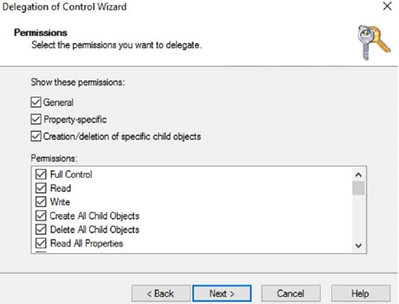
• Select the Computer objects, Create selected objects in this folder, Delete selected objects in this folder checkboxes, and select the Next button to continue.
• Under Permissions, select the Full Control check box as shown below.
• You have completed the permission delegation for the Intune AD connector
MECM:
Deployment Profiles • Device enrollment > Windows enrollment > Deployment Profiles > Create Profile. • Type a Name and, optionally, a Description. • For Deployment mode, select User-driven. • In the Join to Azure AD as box, select Hybrid Azure AD joined.
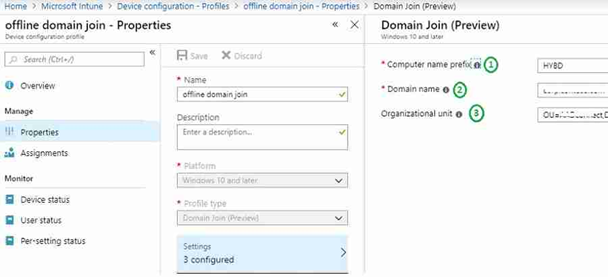
Intune Configuration Profile – Hybrid Domain Join
In Intune, select Device configuration > Profiles > Create Profile. Select Windows 10 and later. Profile type: Select Domain Join. Provide a Computer name prefix, Domain name, and (optional) Organizational unit in DN format.
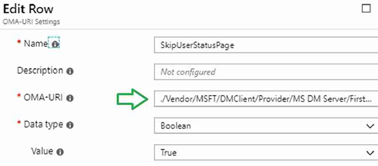
CSP to Disable User Setting in ESP
In the Windows Autopilot Hybrid Domain Join profile scenario, you may observe an error in the enrollment status page (ESP). This error is because of the timeout mentioned in Michael Niehaus’s post. Below CSP configuration will prevent this timeout error. In this post, you will find the Windows Autopilot Hybrid Domain Join Troubleshooting Tips. Let’s go through the steps to configure this CSP. ./Vendor/MSFT/DMClient/Provider/MS DM Server/FirstSyncStatus/SkipUserStatusPage Navigate via Intune blade – Create a profile – Settings – Configure – Custom OMA-URI Settings – Windows 10 and later – Add OMA-URI settings.
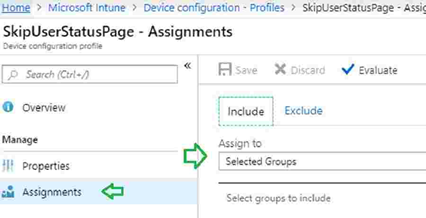
Assign the CSP to the Autopilot device group.
(Optional) Turn on the Enrollment Status Page It is recommended to enable the Enrollment status page. For more details, refer here.
Additional Ressources
Beginners Guide Setup Windows Autopilot Deployment HTMD Blog (anoopcnair.com)
What is an Azure AD joined device? – Microsoft Entra | Microsoft Docs • Azure AD joined devices can still maintain single sign-on access to on-premises resources when they are on the organization’s network. Devices that are Azure AD joined can still authenticate to on-premises servers like file, print, and other applications.